INSTALLATION AND SETUP
Select a preferred configuration for the display before installing the product and setting it up for use.
CAUTION: Follow the installation instructions properly to avoid dropping and damaging the display.
CONFIGURATIONS

UNPACKING THE BOX

Out of the Box Failure
If you experience an out of box failure (OBF) during installation in relation to missing, incorrect, or defective unit or item, send an email to support@glorystargroup.com and provide a description of the issue. Glory Star will first troubleshoot the problem over phone or video to help resolve the issue. If Glory Star determines that a product or component has to be returned to the factory, it will instruct the customer how to remove the components from the product.
CONNECTING TO POWER
To power up the tablet, perform the following steps:
1. Remove the two screws that secure the back cover lid.

2. Remove the back cover lid.

3. Connect the DC power connector to the DC IN port.
NOTE: The L-shaped plug should be placed on the left side.

4. Install the back cover lid and secure with two screws.

INSTALLING MODULES
You can install the following modules to the computer tablet:
• RFID/NFC – automatically identifies persons and conducts access management and mobile payments
• 1D/2D Barcode Scanner – scans printed barcodes and captures data information
RFID/NFC
To install the RFID to your tablet, perform the following steps:
1. Secure the RFID/NFC mount with two screws.


2. Secure the RFID/NFC with two screws.
3. Connect the RFID/NFC module to a USB Type C port on the tablet.
4. Install the back cover lid and secure with two screws.
CONFIGURING RFID FOR TOUCH SCREEN DEVICES
1. Launch the Star Tool app.
2. From the Addon Modules category, select Enter.

3. Select RFID module.

4. Hover an RFID card on the RFID module, and then select Scan card. The Card type and Card ID are displayed.

5. To change the RFID value, type an RFID value, and then select Write value.

6. Select Read card to check new RFID card value.
1D/2D BARCODE SCANNER
To install the 1D/2D barcode scanner to your tablet, perform the following steps:
1. Secure the barcode scanner mount with two screws.

2. Secure the barcode scanner with two screws.
3. Connect the barcode scanner to a USB Type A port of the tablet.
4. Install the back cover lid and secure with two screws.

CONFIGURING MODULE
1. Launch the Star Tool app.
2. From the Addon Modules category, select Enter.

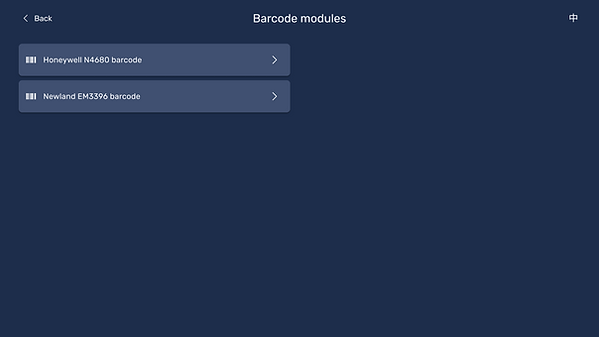
3. Select Barcode modules.

4. Select the installed barcode scanner.

5. Select Keyboard or Serial as the input mode for barcodes. The barcode displays in the Scanned output field.

6. Select one of the following:
• Light modes On – always turns on the barcode scanner light.
• Light modes Auto – turns on the barcode scanner light when it detects a barcode to scan.
• Light modes Off – turns off the barcode scanner light.

7. To add a line break after scanning a barcode, enable Automatically return.
8. To add a beep sound after scanning a barcode, enable Sound notification.
9. To view the list of 1D and 2D supported barcodes, select the format type under Supported format.
WALL MOUNT
You can purchase the Wall Mount accessory to mount the display on a concrete or wooden wall.
To mount the display on the wall, follow these steps:
1. Disconnect the AC power adaptor from the power source to turn off the display.
2. Lay the display face down on a flat surface.
CAUTION: Always use a soft material, cloth or foam, to protect the display when placing the screen face down.

3. Mount the monitor bracket at the back of the display. Secure the bracket with four M4x12 bolts and washers.

4. Place the wall plate on the wall and mark the four mounting holes.
5. Perform one of the following:
• For a concrete wall, drill four 8 mm holes on the concrete wall, and insert an anchor into each hole.

• For wooden mount, drill two 3.8 mm holes on the wood, and insert an anchor into each hole.

6. Align the wall plate with the mounting holes. Secure the plate to the wall with lag bolts and log bolt washers.
CONCRETE WALL

WOODEN WALL

7. Align the display with the wall plate, and then carefully slide down the display until the bracket is safely secured to the wall plate.

8. Secure the bracket to the wall plate with two M5x15 bolts and M5 washers.

9. Plug the AC power adaptor into a power source to turn on the display.
FIX-028 TABLE MOUNT
To install the FIX-028 table mount to the display, follow these steps:
1. Disconnect the AC power adaptor from the power source to turn off the display.
2. Pull up the stand from the base and the VESA plate from the stand.

3. Lay the display face down on a flat surface.
CAUTION: Always use a soft material, cloth or foam, to protect the display when placing the screen face down.

4. Mount the VESA plate at the back of the display. Secure the VESA plate with four M4x12 bolts and washers.

5. Set the display in an upright position.

6. Connect the AC power adaptor into a power source to turn on the display.
